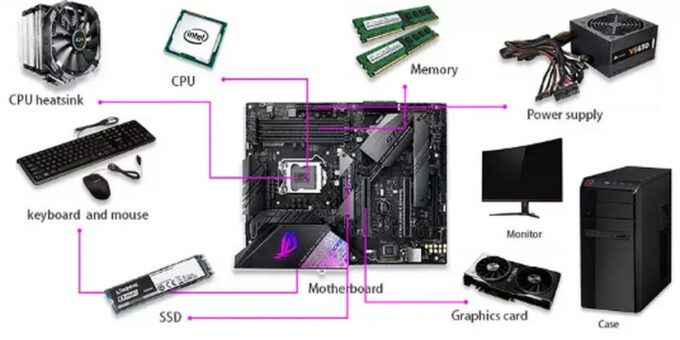
Building your own PC is an exciting and rewarding experience. It gives you complete control over the components and performance. Whether for gaming, work, or content creation, a custom-built PC offers better value than prebuilt options.
Why Build Your Own PC?
Building a PC allows you to choose high-quality parts that fit your budget. You avoid unnecessary software and hardware from prebuilt systems. Custom PCs are also easier to upgrade, ensuring longevity and improved performance.
Understanding each component helps you troubleshoot issues efficiently. Plus, assembling your own system gives a sense of accomplishment. Learning how hardware works enhances your overall technical knowledge.
Choosing the Right Components
Before starting, research and purchase compatible parts. Selecting the right components ensures a smooth build process.
Processor (CPU)
The CPU is the brain of your PC. Intel and AMD are the leading brands. Choose based on your performance needs. Gamers often prefer higher clock speeds, while creators benefit from more cores and threads.
Motherboard
The motherboard connects all components. Ensure compatibility with your CPU and RAM. Look for essential features like Wi-Fi, Bluetooth, and expansion slots. Reliable brands include ASUS, MSI, and Gigabyte.
Memory (RAM)
RAM affects multitasking and performance. At least 16GB is recommended for gaming and productivity. For heavy workloads, 32GB or more ensures smoother performance. DDR4 and DDR5 are the most common types available.
Storage (SSD/HDD)
Solid-state drives (SSDs) offer faster speeds than traditional hard drives. A 1TB NVMe SSD ensures quick boot times and app loading. Use an additional HDD for mass storage if needed.
Graphics Card (GPU)
A dedicated GPU enhances gaming and video editing. NVIDIA and AMD produce powerful options for different budgets. Ensure your choice fits your resolution and frame rate requirements.
Power Supply (PSU)
The PSU powers all components. A high-quality unit prevents failures and ensures stability. Choose a PSU with at least an 80+ Bronze efficiency rating.
Case and Cooling System
The case houses all components and affects airflow. Choose one with good ventilation and cable management. Proper cooling, including fans or liquid cooling, prevents overheating.
Step-by-Step PC Building Process
Step 1: Prepare Your Workspace
Find a clean, static-free area with enough space. Gather all necessary tools, including a screwdriver. Work on a non-carpeted surface to avoid static electricity.
Step 2: Install the CPU
Open the motherboard’s CPU socket carefully. Align the CPU with the marked indicators and gently place it in. Secure the locking mechanism without applying force.
Step 3: Install the RAM
Locate the RAM slots and open the latches. Insert the RAM sticks in the correct slots for optimal performance. Press down firmly until they click into place.
Step 4: Install the Storage Drive
Attach your SSD to the motherboard’s M.2 slot or SATA connectors. Secure it with screws if necessary. For HDDs, use SATA cables to connect them properly.
Step 5: Install the Motherboard
Place the motherboard inside the case and align it with standoff screws. Secure it using a screwdriver without overtightening. Ensure all ports align with the case’s I/O shield.
Step 6: Install the Power Supply
Mount the PSU in its designated spot, usually at the bottom of the case. Connect power cables to the motherboard, GPU, and storage drives. Proper cable management improves airflow and aesthetics.
Step 7: Install the Graphics Card
Insert the GPU into the PCIe slot on the motherboard. Secure it with screws and connect the required power cables. Ensure it sits firmly in place before closing the case.
Step 8: Connect Case Fans and Cooling
Attach case fans in positions that promote airflow. Connect CPU cooling solutions, whether air or liquid. Proper cooling extends component lifespan and ensures stable performance.
Step 9: Double-Check All Connections
Verify that every cable is securely connected. Look for potential loose components that might cause issues. A quick recheck prevents common setup mistakes.
Step 10: Power On and Enter BIOS
Press the power button and check if all fans and lights function properly. Enter BIOS by pressing the designated key (usually Delete or F2). Ensure the system detects all components.
Installing the Operating System and Drivers
Use a USB drive with a bootable operating system installer. Windows and Linux are popular choices, depending on your needs. Follow the on-screen instructions to complete the installation.
Once installed, download essential drivers for the motherboard, GPU, and peripherals. Keeping drivers updated ensures maximum compatibility and performance.
Testing and Benchmarking Your PC
Before heavy use, test the system for stability. Run benchmarking software like Cinebench and 3DMark to assess performance. Monitor temperatures and adjust fan speeds if necessary.
Stress testing identifies potential hardware issues early. Programs like Prime95 and FurMark simulate extreme conditions. If crashes or overheating occur, recheck cooling and connections.
Optimizing Your PC for Best Performance
Enable XMP or DOCP profiles in BIOS to maximize RAM speed. Adjust power settings for better efficiency and longevity. Regularly clean dust buildup to maintain optimal temperatures.
Organize files and remove unnecessary software to keep your system fast. Use an external storage drive for backups. Simple maintenance habits improve long-term performance.
Conclusion
Building your own PC provides a sense of achievement and long-term benefits. It ensures better performance, easier upgrades, and cost savings. With the right components and careful assembly, you can create a powerful, customized machine.